Go Back

Homemade Ghee

Donnie
From the Rig Veda, dating to approximately 1500 to 1000 BC, in a hymn describing ghee poured into the sacred fire:
“Tongue of the gods, navel of immortality. We will proclaim the name of ghee. These waves of ghee flow like gazelles before the hunter. Streams of ghee caress the burning wood.”
Clarified butter, continuously made in India since at least 2000 BC and possibly as far back as 6500 BC. Referenced in the Rig Veda, the Yajur Veda and the Bhagavad Gita as a sacred substance. Still the correct answer to the question of how to preserve butter in heat.
Makes: approximately 2 cups of finished ghee
Cook Time 1 hour

Jump To

Donnie Dodson

Don’t lose this one.

I’ll email it to you so it’s waiting when you’re ready to cook.

Ingredients
  

  • 8 sticks 2 pounds unsalted butter, cut into rough chunks — the quality of your starting butter directly determines the quality of your finished ghee. A good quality European-style butter with higher butterfat content, such as Kerrygold or Plugra, produces a noticeably richer, more flavourful ghee than standard supermarket butter. This is the one moment in the recipe where quality of ingredient makes the biggest difference

Equipment

  • 1 A heavy-bottomed saucepan, medium to large
  • 1 A fine mesh strainer or cheesecloth
  • 1 A clean glass jar with a lid for storage
  • 1 A heat-resistant ladle or large spoon

Instructions
 

Melt and begin the slow cook

  1. Place all the butter chunks in a heavy-bottomed saucepan over medium-low heat. Allow the butter to melt completely, which will take 3 to 4 minutes. Once melted, reduce the heat to low. The entire cooking process from this point should happen over low heat. This is the most important instruction in the recipe. Too high a heat will burn the milk solids before they have had time to properly separate from the fat and settle to the bottom.

Cook low and slow for 45 minutes to 1 hour

  1. The butter will go through several visible stages over the next 45 minutes to 1 hour. In the first 10 to 15 minutes, the water content in the butter will begin to evaporate and you will see gentle bubbling on the surface. The liquid will look opaque and pale yellow at this stage. Stir every 5 to 10 minutes to prevent the milk solids from sticking to the bottom of the pan and burning.
  2. Between 15 and 30 minutes the butter will become clearer and you will begin to see the milk solids separating and settling toward the bottom of the pan. The surface foam will reduce. The colour of the liquid will begin to deepen toward a warm golden amber.
  3. Between 30 and 45 minutes the bubbling will reduce significantly as most of the water has evaporated. The liquid will be largely clear and deep golden. The milk solids on the bottom of the pan will be turning a light golden brown colour. This is the most critical stage. Watch carefully and stir gently. The smell at this point should be deeply nutty, toasty and extraordinarily good. The moment the milk solids on the bottom of the pan turn a light amber brown and the liquid above is clear and golden, the ghee is done.
  4. Remove from the heat immediately. The residual heat in the pan will continue to cook the milk solids for a moment after you remove it from the burner, so err on the side of taking it off slightly early rather than late.
Filter and store

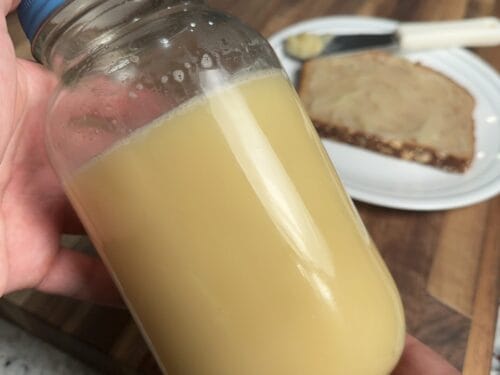
  1. Allow the ghee to cool for 5 minutes. Line a fine mesh strainer with cheesecloth or a coffee filter and set it over your clean glass jar. Pour the ghee through the strainer slowly, leaving the browned milk solids in the pan. The filtered ghee should be completely clear, deeply golden and smell like the best toasted butter you have ever encountered.
  2. Allow to cool completely before sealing the jar. The ghee will solidify slightly as it cools to room temperature, taking on a soft, spreadable consistency. It will remain liquid at cooking temperatures.

Video

Notes

  • The milk solids left in the pan after straining are not waste. They are deeply flavoured, toasted, nutty and can be stirred into oatmeal, spread on toast or added to vegetables. They are the byproduct of making ghee and they are delicious.
 
  • The single most common mistake in ghee-making is using too high a heat. If your ghee smells bitter or the milk solids are dark brown rather than light golden amber, the heat was too high. Start over with fresh butter and go lower and slower. It is genuinely difficult to burn ghee on a true low heat setting over an hour.
 
  • A wider pan produces ghee faster than a narrow one because the surface area allows water to evaporate more quickly. A heavy-bottomed pan distributes heat more evenly and reduces the risk of burning. Both factors are worth considering if you make this regularly.
 
  • If you want to verify that your ghee is finished without relying entirely on visual cues, drop a small amount of water into the pan while it is still hot. If the ghee spits and crackles violently, there is still water present and it needs more cooking time. If there is almost no reaction, the water has fully evaporated and the ghee is done.